Wednesday, April 15, 2009

Upsy Daisy

I had to play with my new toys! I received this stamp set and the die cut in my last Stampin' Up order. I've been drooling over the Upsy Daisy set now for quite a while but didn't want to spend the money. Especially since I have other flower sets...but I don't have many (any?) nice siloutte stamps.


Isn't it a gorgeous stamp? I'm a little disappointed in my first card. For once...the picture looks better than the card in real life. I think it would have been better with black and red instead of brown and red. Oh well...live and learn (and then get Luvs! :-)) The basic layout is this week's sketch challenge over on Splitcoast.

I have two more cards to share in the days to come (another new stamp set and a digital image). Sorry I've been slacking a bit. I'm not sure it's going to get much better in the near future. This weekend is pretty muchly booked with a bridal shower and a "quilting date"...so probably no card making.

Have a great rest of the week!

Jane

Friday, April 10, 2009

Clean and Simple (CAS) Challenge

This card was inspired by a CAS sketch challenge on SCS. I think it came out pretty darn cute!


The cupcake stamp is from $1 set I bought at Michael's. The greeting is from Clear Dollar Stamps.


Here's the inside. I just pen stitched/doodled around the edges. Then I closed the card and used the circle cutout as my guide for stitching the circle around the image itself.

My dang dog (the puppy) has eaten TWO stamps within the last couple weeks. They are my $1 stamps I just bought. One I've used once and the other I haven't used at all. Argh!

Hope everyone has a GREAT Friday!

Jane

Tuesday, April 7, 2009

A new favorite card?

I am SO happy with how this card turned out! I used one of the precut cards that I purchased at the scrapbook expo a few weeks ago. But if you have the nestabilities you could probably make a similar card yourself.


I started by just stamping the bathtub image (Stampin' Up) near the center of the white circle. I paper pieced the towel on her head. Colored the image in with copic markers. Added a little stickles (glitter glue) to the bubbles. Once the image was finished it looked like it was just floating in the middle of the card. It needed a foundation of some sort. What better than a bath rug? So I stamped my image again on a post it note, cut out the bottom of the bathtub and put it on top of my colored image as a mask (didn't want to get pink ink on it after all that effort). Next I inked up the solid oval stamp (Amuse) in pink ink and stamped it over the feet of the tub.


Then I wanted a greeting of some sort. I picked through my greetings and didn't find anything I liked. I finally decided on just a simple one word stamp "Fabulous" (Clear Dollar Stamps). It is a polymer/acrylic stamp so I was able to curve it just a little bit on my block so it fit the curvature of the circle. Then I stamped it repeatedly - leaving a little space in between each word. The last thing was tying just a bit of ribbon at the top. This served a visual purpose as well...it hid the 'flat' portion of my circle card.

What do YOU think? I'm always amazed when I come up with a girly card that I like...because I am NOT a frilly/girly kind of gal! :-)

Jane

Saturday, April 4, 2009

It's the "Digi" Easter Bunny!

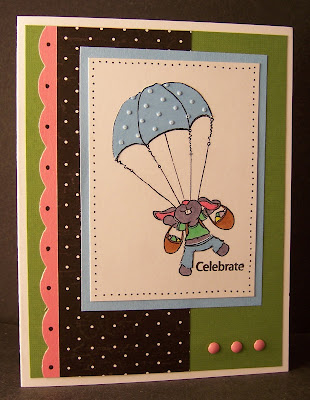
Mel over at Mel Stampz offered up some free "digital images". The images themselves are pretty large (about 6 inches) so I resized mine. I also printed it a second time onto the blue paper so I could paper piece it. I'll put the directions on how I resized and hints for printing to paper piece down below.


I was able to resize just using my printer options. I clicked on the image (so it's full screen) then chose 'Print'. Then I clicked on 'Preferences', then clicked on the 'Effects' tab and down on the left there is a box that says 100% of normal size. You can choose any percentage you want. I printed mine at 50% and they are about 2 1/2 inches tall (and cute as the dickens!)

Also, a tip...if you want to paper piece but want to use scraps (instead of feeding full sheets of cardstock/paper through)...on the top sheet of paper in your printer mark one of the corners (like BL for bottom left). Then print your image. Now place your scrap on top of the printed image and adhere with a temporary adhesive. Place the sheet back in your printer tray with the BL in the bottom left corner (so you know it's going to print in the same place again). Now print it again. You can send that same base sheet through as many times as you want and you can use up some of your smaller scraps of patterned paper.

So I resized and printed my image once on cardstock and once on the light blue paper. I cut out the parachute part from the blue paper...when paper piecing you want to cut slightly inside the line. To add dimension I took my blue parachute and put it inside a cuttlebug embossing folder and embossed it after I'd cut it out. Then I layered the cut/embossed parachute onto the base stamped image. Then I colored in the rest of the image.

I got the card layout from the Clean and Simple stamping blog. I like this blog for simple layouts. A lot of time I dress them up a bit...but it's a great starting place!

My quilting get together got cancelled for today. I'm kind of bummed out but we've rescheduled it. And I made a "play date" with my former upline (I used to sell Close to My Heart) for tomorrow. So I should have plenty of new stuff to share this week!

Have a great evening.

Jane

Wednesday, April 1, 2009

No stamping...

I really wanted to do some stamping today...but got sidetracked. Instead I spent the afternoon/evening baking cookies. I now have a plethora of chocolate chip and peanut butter cookies...but no cards to share. :-( I did spend a little time weeding through my old stamp sets and cleaning out some of the ones I no longer use. When I first started stamping my style was totally different than what it is now. So far ALL I've gone through is stamps and I already have a box of stuff to give away...and you can't even tell by looking in my stamping space...how sad is that? :-)

This Saturday I am getting together with a couple friends and we are going to make a quilt. I picked up my fabric Monday night. I'm still not sure I'm thrilled with my choices but it'll do. I'm definately going to need to find a cheaper way to quilt if I'm going to keep at this. Anyone have any tips on that? Favorite online stores? Coupons for Joann's? That sort of stuff.

Ok...I'm tuckered out. Hope everyone is doing well...and I will try to find some time to make a few cards this weekend. It's just been crazy busy lately.

Jane

Sunday, March 29, 2009

First Spinner Card

The idea for this card started festering in my head about a week ago. I've been mulling it over in my head trying to figure out how I wanted to do it. I'd been in a grumpy mood and vented to my boss. Then I felt guilty about venting so I apologized and told him I'd come back to work the next day with an attitude adjustment. Him, being the smart aleck he is, asked me, "Is there some sort of adjustment knob for that? 'Cause if so I need to find mine too." And this card is the result of that comment.


Today I found a tutorial on the spinner card over on Angie's blog. If you want to make your own...you can click HERE and view her video tutorial. Basically there is a channel cut in the front of the card and the image (in this case the 'knob') will roll inside the channel. If you view Angie's tutorial you can see why they call it a "spinner" card.

For the 'knob' I used word art in Word and put it into a circular shape.

Jane

Saturday, March 28, 2009

Paper Finds

I was at the scrapbook show last weekend and spent about a third of my money at a booth that had precut cards. Yes...I can cut them myself...but not this professionally. And they will make easy cards!

Here's a couple of the packages I bought.


I particularly like the circle cards. I have some images from CTMH that I think will go really well on these and will make SUPER quick girlfriend type cards.

Today I also finished my son's quilt (tied it). My finger is sore from doing all that poking through the fabric. I guess I can see where a thimble might come in handy! :-)

Tomorrow I am planning on going out and buying fabric for my next quilt (a baby quilt), and I'm planning on helping my niece design her wedding announcements. I bought stuff to make cookies this weekend...we'll see if I get around to that or not! LOL. It seems like there is always more stuff to do than there is time to do it in.

Jane