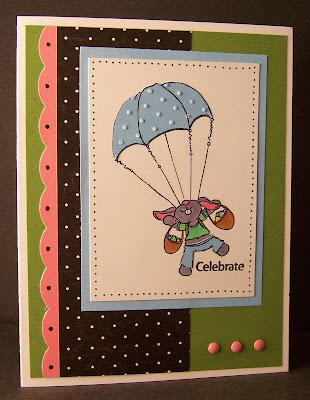
I was able to resize just using my printer options. I clicked on the image (so it's full screen) then chose 'Print'. Then I clicked on 'Preferences', then clicked on the 'Effects' tab and down on the left there is a box that says 100% of normal size. You can choose any percentage you want. I printed mine at 50% and they are about 2 1/2 inches tall (and cute as the dickens!)
Also, a tip...if you want to paper piece but want to use scraps (instead of feeding full sheets of cardstock/paper through)...on the top sheet of paper in your printer mark one of the corners (like BL for bottom left). Then print your image. Now place your scrap on top of the printed image and adhere with a temporary adhesive. Place the sheet back in your printer tray with the BL in the bottom left corner (so you know it's going to print in the same place again). Now print it again. You can send that same base sheet through as many times as you want and you can use up some of your smaller scraps of patterned paper.
So I resized and printed my image once on cardstock and once on the light blue paper. I cut out the parachute part from the blue paper...when paper piecing you want to cut slightly inside the line. To add dimension I took my blue parachute and put it inside a cuttlebug embossing folder and embossed it after I'd cut it out. Then I layered the cut/embossed parachute onto the base stamped image. Then I colored in the rest of the image.
I got the card layout from the Clean and Simple stamping blog. I like this blog for simple layouts. A lot of time I dress them up a bit...but it's a great starting place!
My quilting get together got cancelled for today. I'm kind of bummed out but we've rescheduled it. And I made a "play date" with my former upline (I used to sell Close to My Heart) for tomorrow. So I should have plenty of new stuff to share this week!
Have a great evening.
Jane


10 comments:
Your bunny is so cute!! I want to thank you for the re-sizing help again too. The paper piecing help is great too. I never thought of that.
Jane, this is SO fabulous. I love love LOVE how you paper pieced the parachute & embossed it!!! Thank you sooooooh much for posting these great printing & paper piecing instructions. I had wanted to post the printing to scale instructions, but have a migraine that's keeping my brain from working enough to type it out. I would have never thought of that brilliant way of using scraps to print digis. Pure genius!:O)
That is adorable! Love how you CB'ed the parachute!
You did a super job with Mel's image...if I can find where I put the one I printed off this morning (!), I will make one too!
Great card! I love the color combo and that image is wonderful! I may try it soon!
Love,
Diana
super super cute! and, great job on your first spinner card too!
Gorgeous card and such a sweet image, I wouldn't have thought of paper piecing a digi image, great idea!
Have a great day! Debx
Awww....such a cutie!! Love that image and what a great job you did with your papers and layout too! :)
I just love your card! Here is a link to one I made using the digi images! http://www.splitcoaststampers.com/gallery/photo/1308670?cat=16636 Hope you like it. I just love the idea of running the parachute through my CB to emboss it! What a great idea! I will have to try that sometime as well.
What a great digital image! Your card turned out really cute!
Post a Comment